2021年12月2日星期四

GM MDI2 Clone SPS Programming ECM (Update, Setup etc)


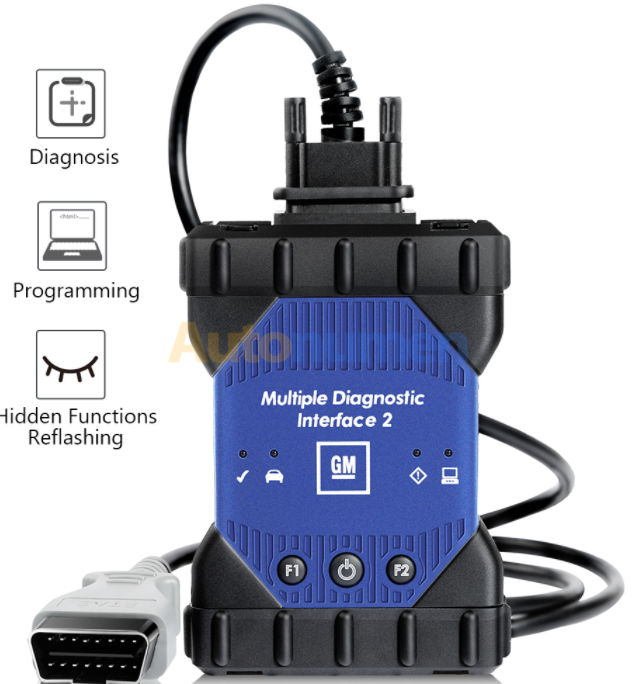
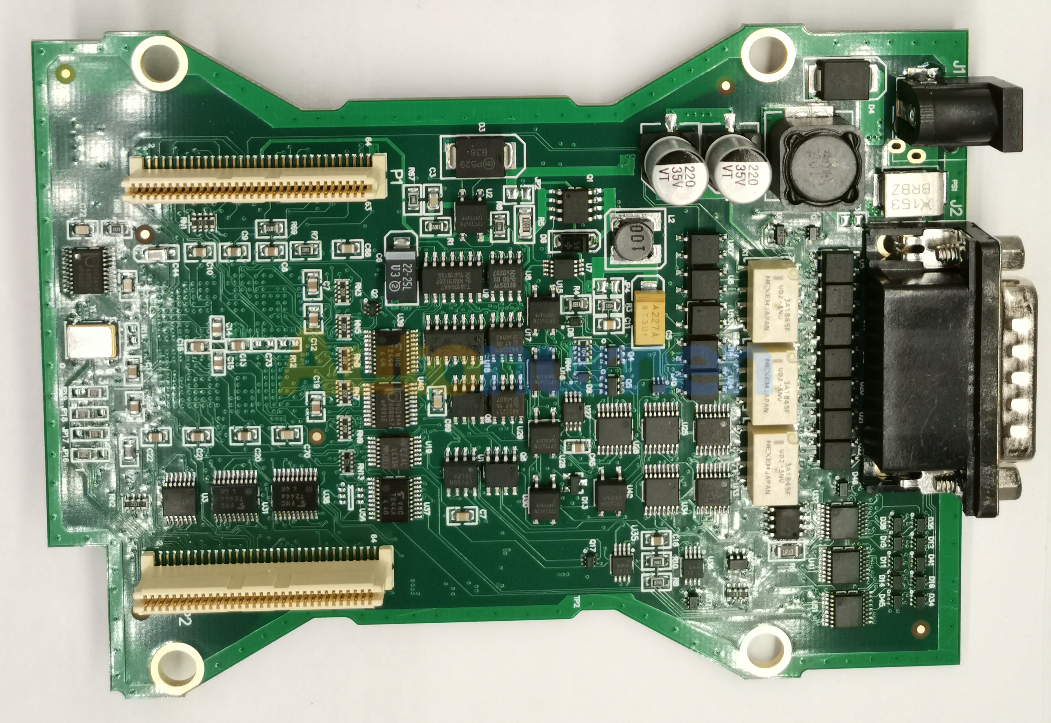
What’s going on everybody, I’m super excited to be diving into Chinese knockoff GM MDI 2 Multiple Diagnostic Interface for bench programming an ECM, we will walk through setup, connecting it through ACDelco Tis2Web and then use SPS to program the actual controller.

Part 1. GM MDI 2 win MD1:

Now these units are basically the same thing except the MDI2 has a couple extra features as far as the WiFi goes. This thing will allow you to connect to your router as opposed as ac delco where you’re connected directly to it, so once you’ve connected to the router, you can plug it into your car, pull up the MDI software which we will look at here in a second and remotely connect to it without having to go wi-fi point to point.  the other part that MDI2 has over MDI 1 is that this unit will do global b which is the latest communications protocol that they’re just now rolling out. So most of you don’t need to spend the extra 
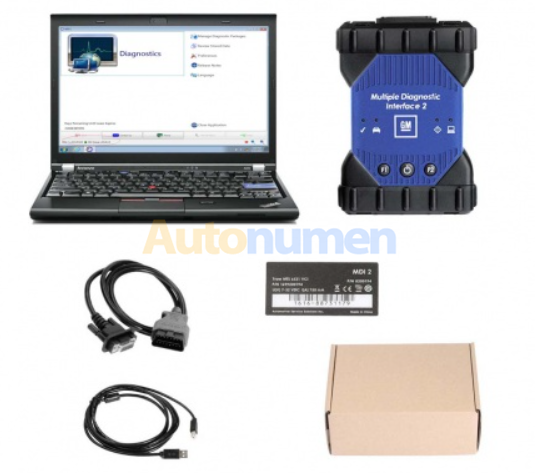
money, this was less than 300USD for the Chinese knockoff now. Brand-new these units from Bosch are about 1400 dollars and it’s kind of an economy a scale thing where bosh has these things, maybe they make a thousand of them ship them out to dealerships and service shops and things like that. Well then the Chinese manufacturer makes 20,000 of them, and they can sell for cheap.
GM MDI2 Clone SPS Programming ECM (Update, Setup etc)-1 (2)

Part 2: Hardware connection

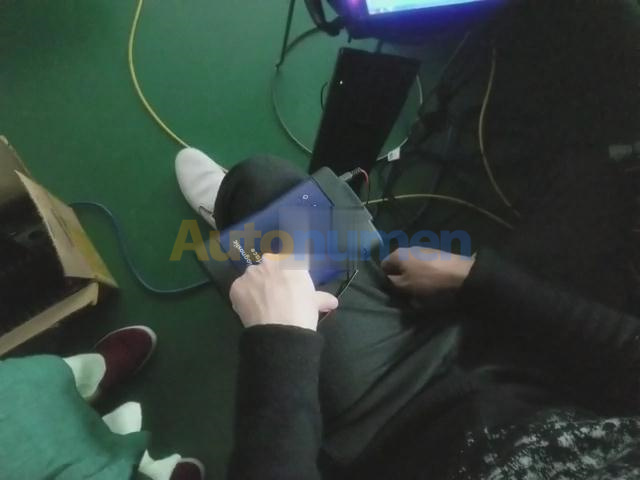
So this should work exactly like the Bosch unit that’s what we’re here to see and on top of that we’re gonna be using our bench force power block too. I love this device, it is my favorite tool right now for doing any kind of bench logging, programming, troubleshooting and things like that. Cool thing about it is it has these nice proprietary Snap on connectors that you’re not going to accidentally disconnect along with your OBD2 port and your power port.

And then your ECM you get a harness like this, this is E67, this plugs into the bench force unit and it’s not gonna come loose in the middle of programming.

I’ve got E99 fifth flash sixth gen five and a half gen whatever you want to call the new 899 for the brand new silverados.

And bench force has been cool enough to send me a third gen for the P01 P59 platform that I’m going to be doing later on.

And let’s go ahead and get everything hooked up and connected and running.

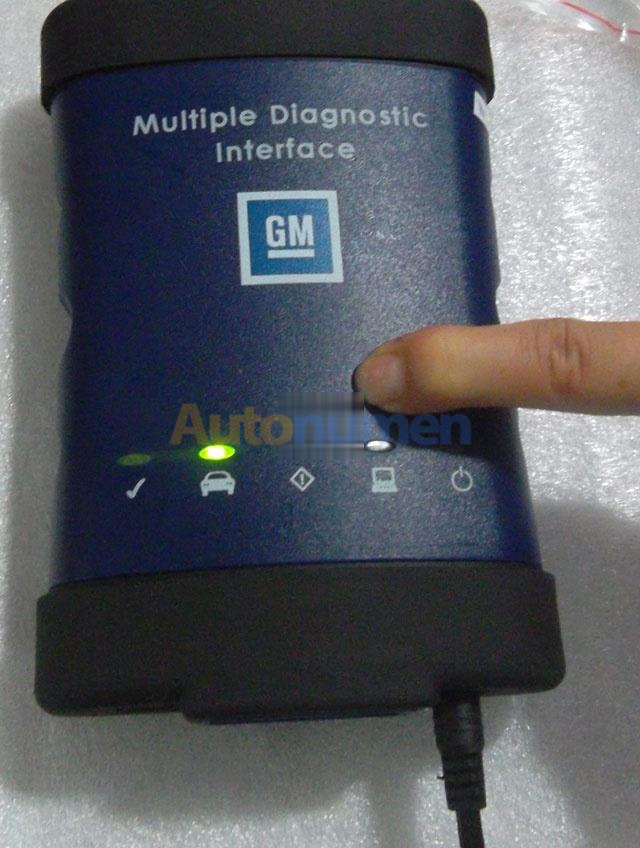
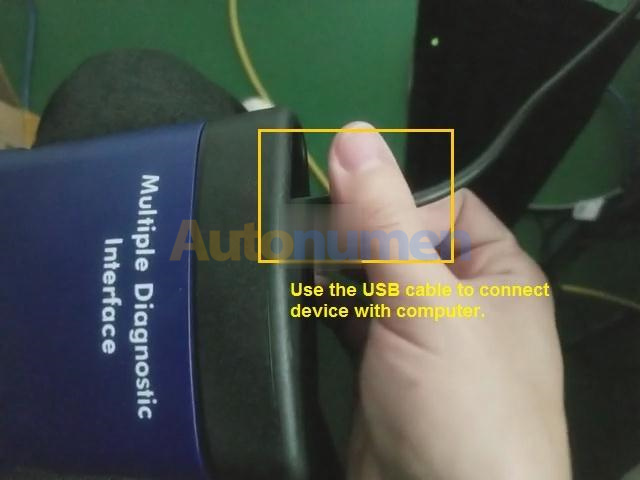
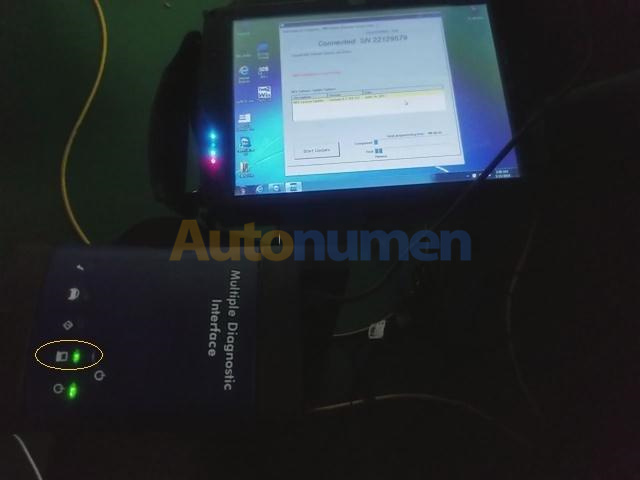
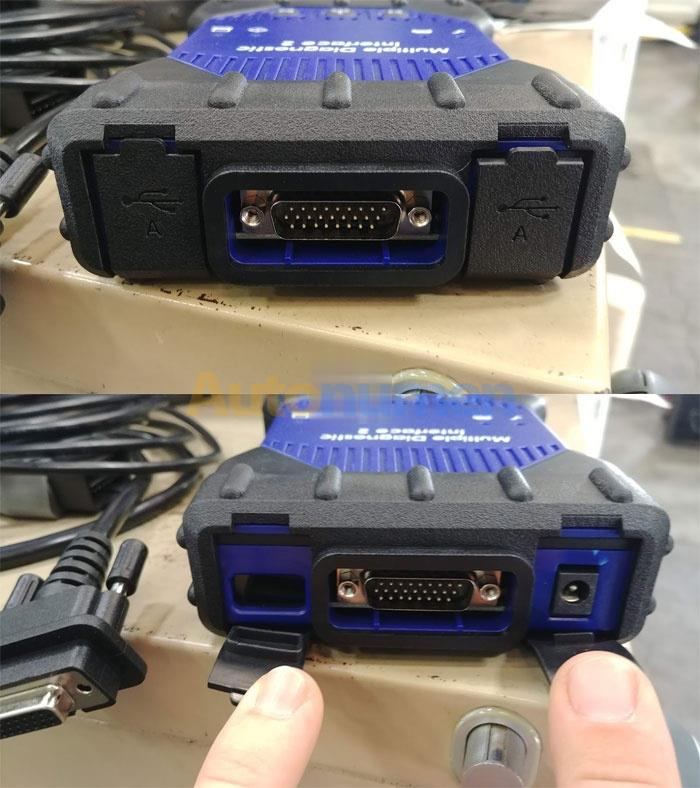
OK, one thing to keep in mind is that MDI2 has to be connected into an OBD2 port that supplies power or else, the unit itself will not power up, it takes about 30 seconds for its power up.

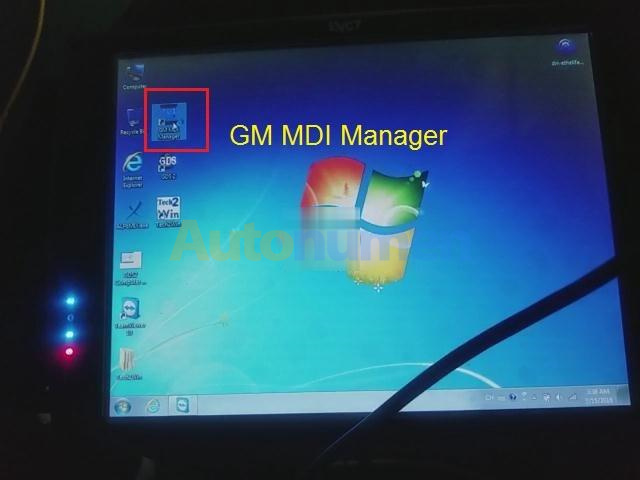
Part 3. Upgrade GM MDI Manager

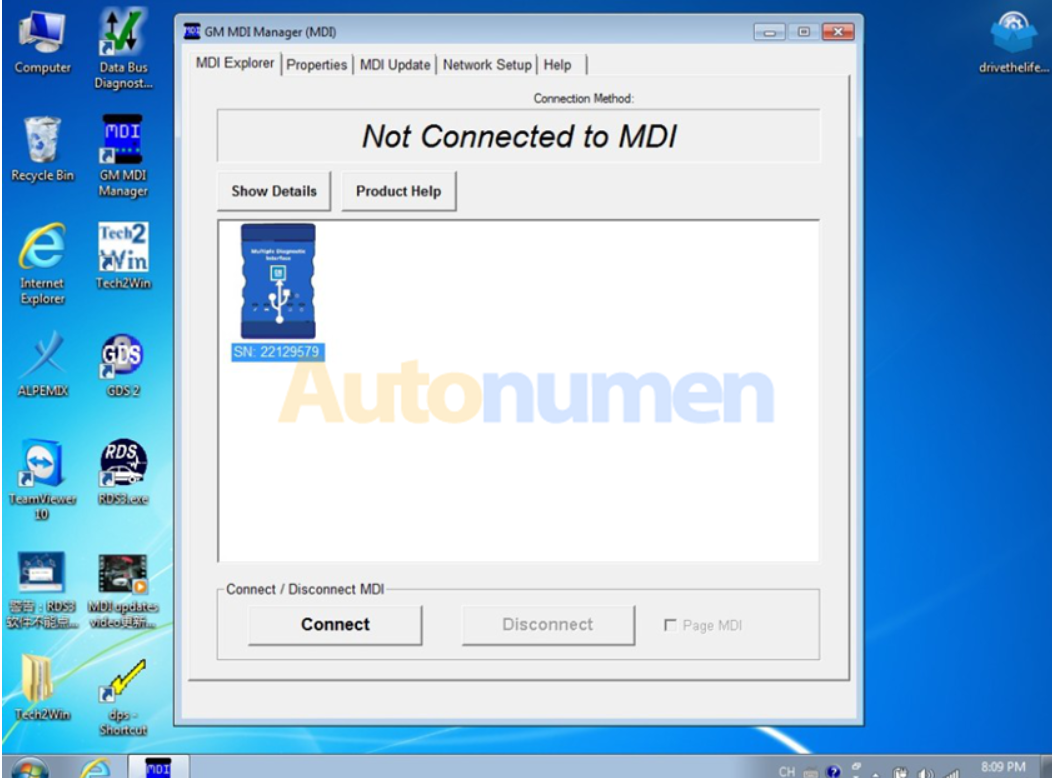
And I’m going to go ahead and pull up our screen here, this is the MDI manager

GM MDI2 Clone SPS Programming ECM (Update, Setup etc)-2 (2)

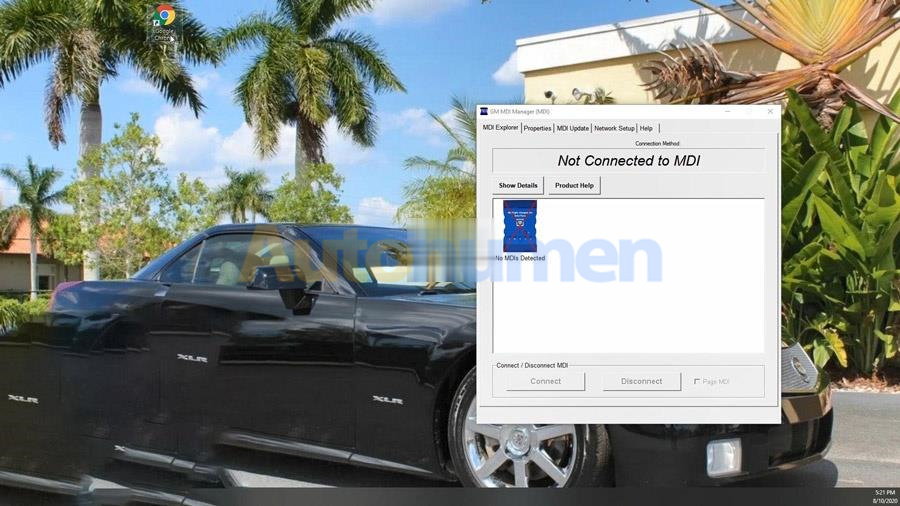
and here’s a quick tip:

I’m using Chrome Internet explorer whenever you launch this, make sure you run as administrator, it will save you a lot of headache down the road, but we will just search “Bosch mdi 2 software”, it’s the same software for the MDI 1 and MDI 2.

This is V8.5.33.53.exe which I believe is an older version.

GM MDI2 Clone SPS Programming ECM (Update, Setup etc)-3 (2)

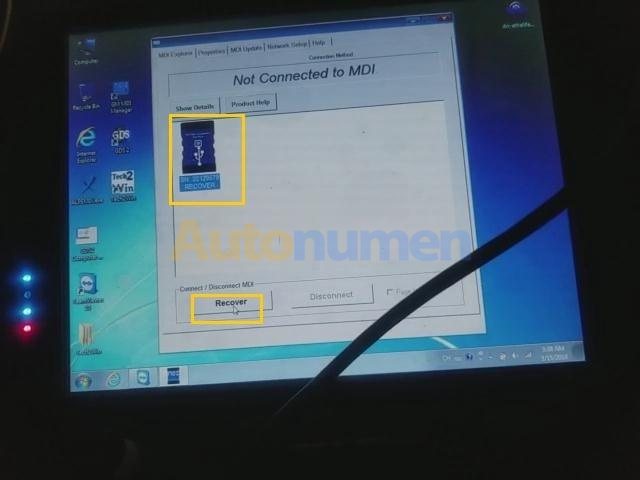
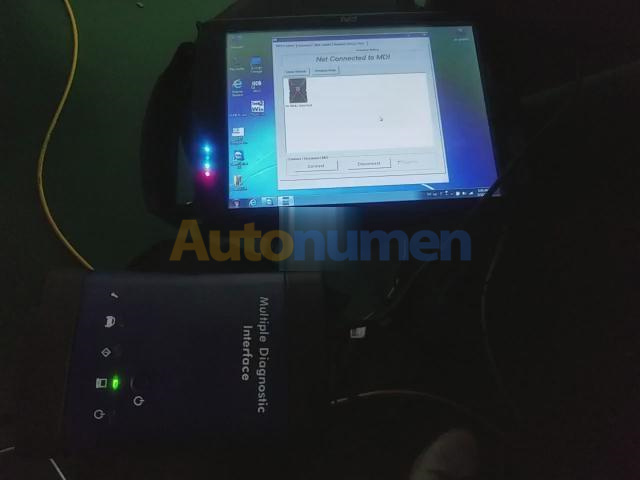
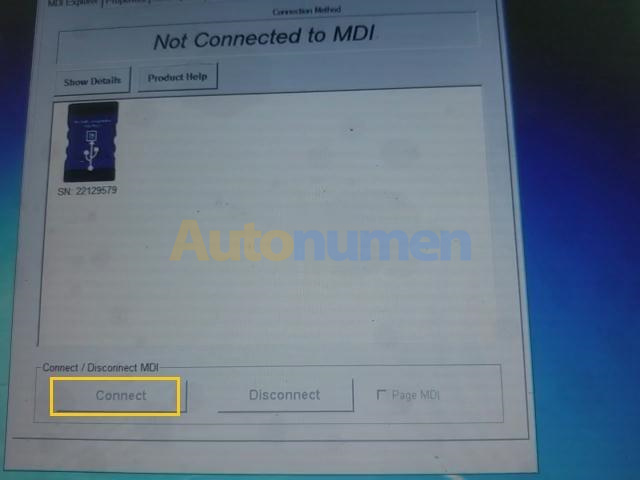
Here’s our unit, now we are showing that we’re connected, you always have to connect up via usb the first time, but once you connect up with usb, you can then come in here, sometimes this thing can be a little, the software is a little finicky and it doesn’t want to connect, if so just kind of power cycle everything and plug it back in and out, I’ve had this happen a couple times and I think it’s the software I don’t think it’s actually the interface itself, but as I said you gotta plug in with USB the first time and then you can come in here.

GM MDI2 Clone SPS Programming ECM (Update, Setup etc)-4 (2) GM MDI2 Clone SPS Programming ECM (Update, Setup etc)-5 (2)

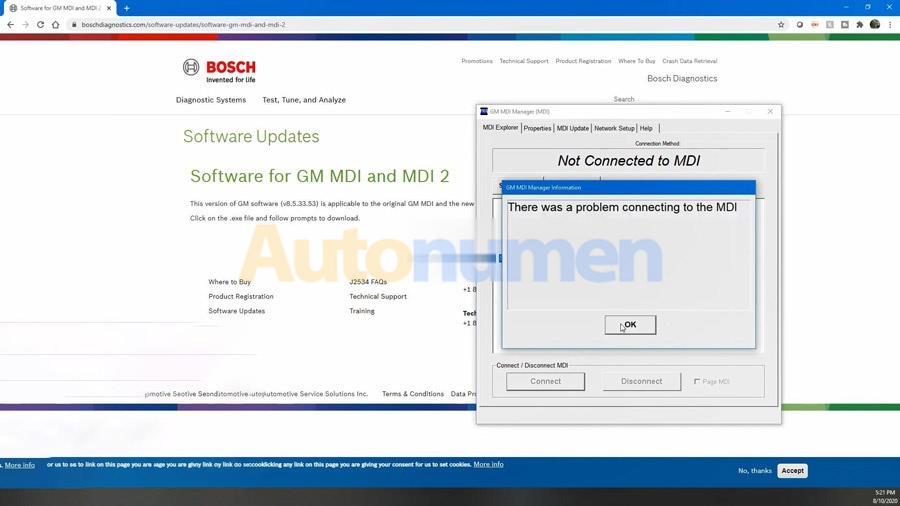
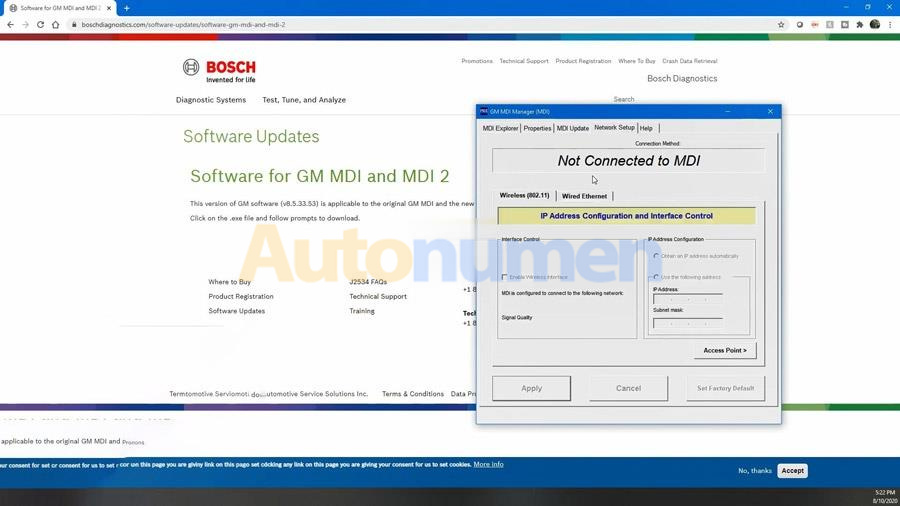
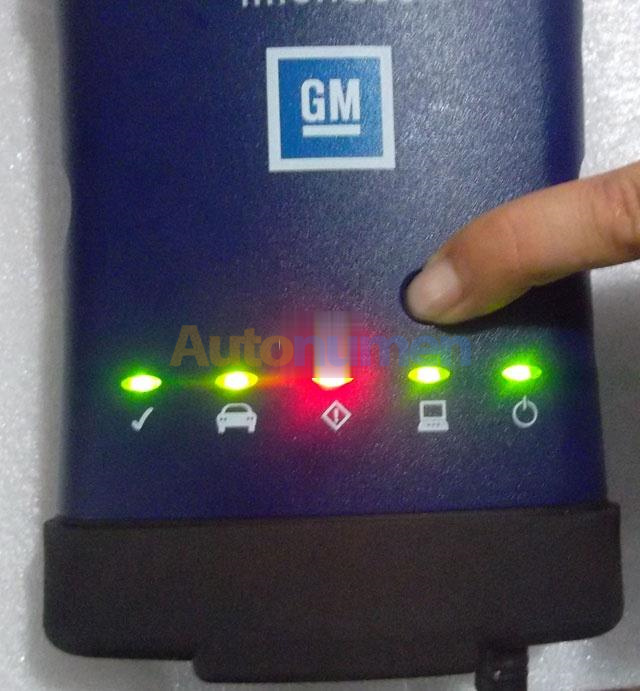
After you get connected to the MDI2, set up your wireless interface, and do your “Access Point”, if you want to do a the wireless side of it, we’re just going to stick to a USB for now and it’s still booting up over there.It is finished, now we can try and connect up, there we’re connected.

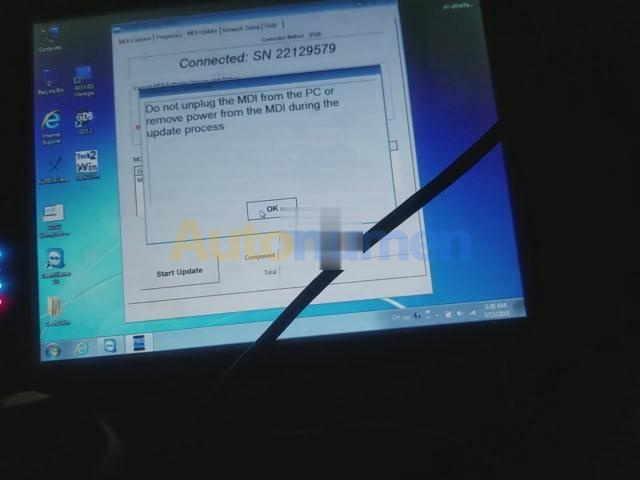
We go the “Help”, we can look at the variations, this says 8.5.33.53 that is the version that’s on the website, now I downloaded this version and it actually brought up an earlier version and it may have been the version that was on the MDI itself whenever I connected up through SPS, so keep that in mind whenever you do an update through SPS for this stuff, you may have to reboot I did once.

GM MDI2 Clone SPS Programming ECM (Update, Setup etc)-6 (2)

Part 4. Login AC Delco, GM MDI 2 Scanner program with SPS

So now we’re gonna go over to AC Delco, let them login.

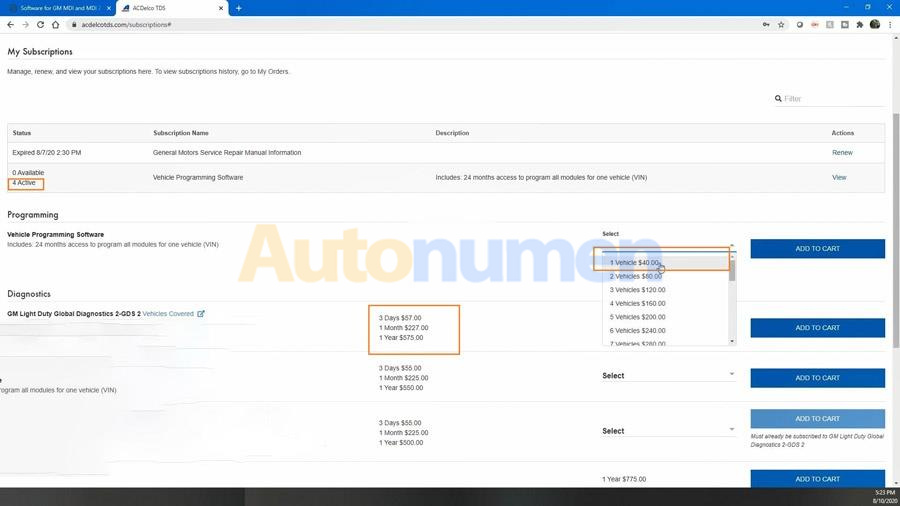
We got a couple options here, SPS is going to be the one that we focus on today and that is for actually programming modules: ECM, BCM, TCM and things like that and so I actually have four active right now, as you can see over here, we’re gonna use one of my existing actives.

GM MDI2 Clone SPS Programming ECM (Update, Setup etc)-7 (2)

But if you need to do your own programming, you can add a vehicle for two years for 40 bucks and it’s based off of VIN number, you can also use this for GDS2 which is the later variation of GM TECH2 for the newer vehicles, GM Tech2 only good up until about what 2013 on some platforms, some platforms even before that might require GDS2, and then they’ve got different prices where you can get three days access for 57 dollars for troubleshooting or if you’re serious and hardcore, you’d go for a year 575, same with the Tech2win software where this differs from something like the VCX Ddiag that software bootleg and so it doesn’t work very well it’s very hard to get those devices to work so by spending the extra hundred dollars for an MDI 2, a you have a device that works like the factory devices that we’re using at GM. So keep that in mind you can save money by going to cheaper but there’s gonna be some headaches you could go a little bit more expensive, you shouldn’t have any headache.

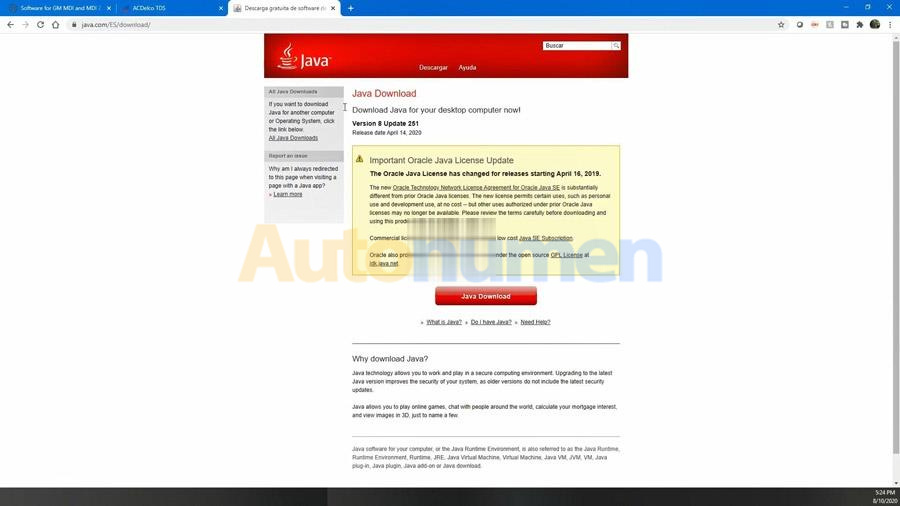
Now I will tell you notice how I right clicked on a Chrome and I chose run as administrator, it will save you headaches down the road, especially whenever you’re updating software, in particular the wrapper for the MDI2. In order to work with SPS, make sure you’re always running a administrator and you also need to install Java, but if you just go over the browser and type in Java software, you can go to the Java download, grab this version and it will work, this is the version that I’m currently running.

GM MDI2 Clone SPS Programming ECM (Update, Setup etc)-8 (2)

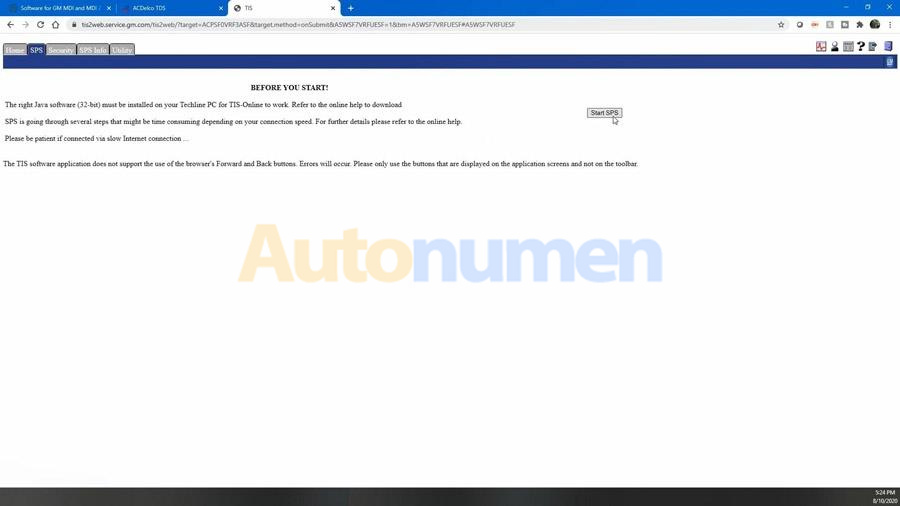
so let’s go ahead, we’re going to grab one of these VIN numbers, this is probably a Cadillac XLR and they’ll say oh I’m sorry I use this because I was logged in previously it’s going to terminate that one and let us open up. So think now we’re going to go into the SPS system and on Chrome it won’t launch this natively on Internet explorer, it will on Chrome it’ll just ask you to download these files, and once it’s done downloading you can click it and it’s going to launch SPS.

GM MDI2 Clone SPS Programming ECM (Update, Setup etc)-9 (2)

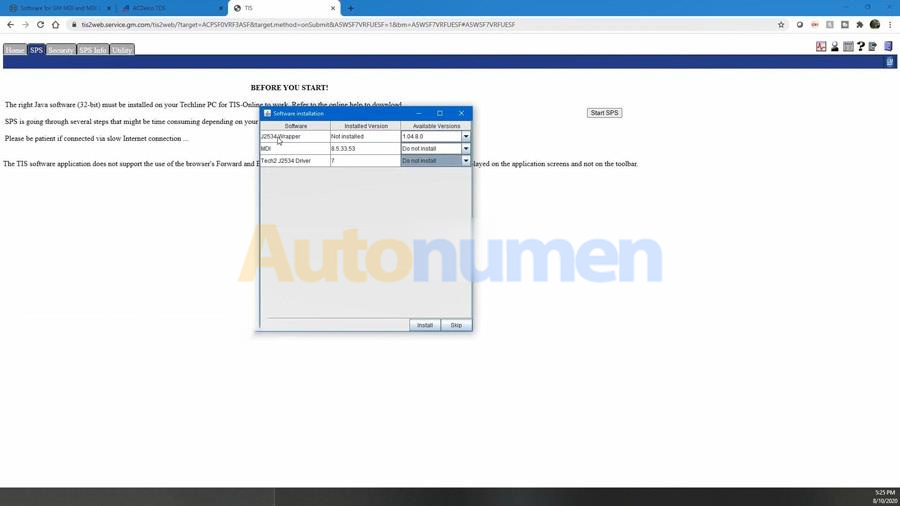
Alright, let’s do this thing in the background, it’ll pop up a software installation table. Now pay attention you’ll show your installed version: the Tech2 drivers: 7, MDI: 8.5 and it says available versions make sure you choose “do not install” on these older versions, but we need to install this J2535 Wrapper, this is what allows SPS to talk to the MDI2 and if you do not run this as administrator, this will not work, trust me I know because I tried.

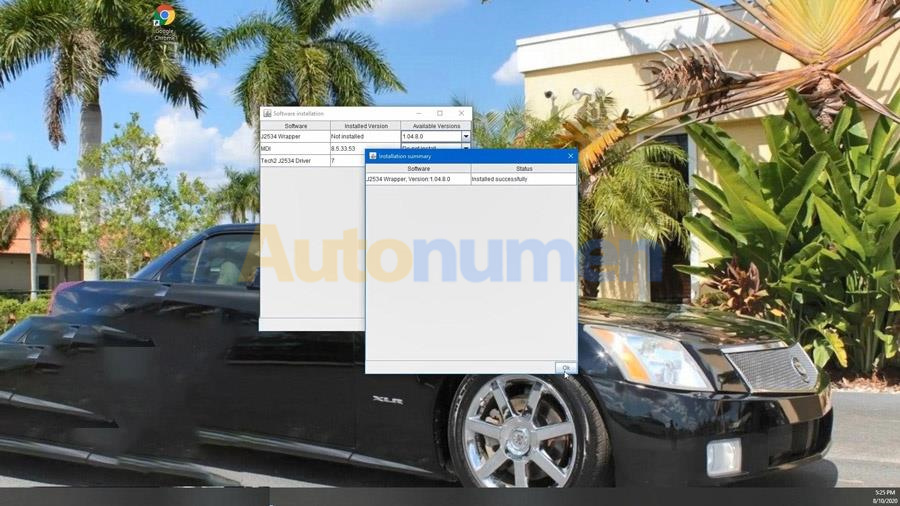
So now that we’ve read as administrator, you can see that we have installed it successfully.

GM MDI2 Clone SPS Programming ECM (Update, Setup etc)-10 (2) GM MDI2 Clone SPS Programming ECM (Update, Setup etc)-11 (2) GM MDI2 Clone SPS Programming ECM (Update, Setup etc)-12 (2)

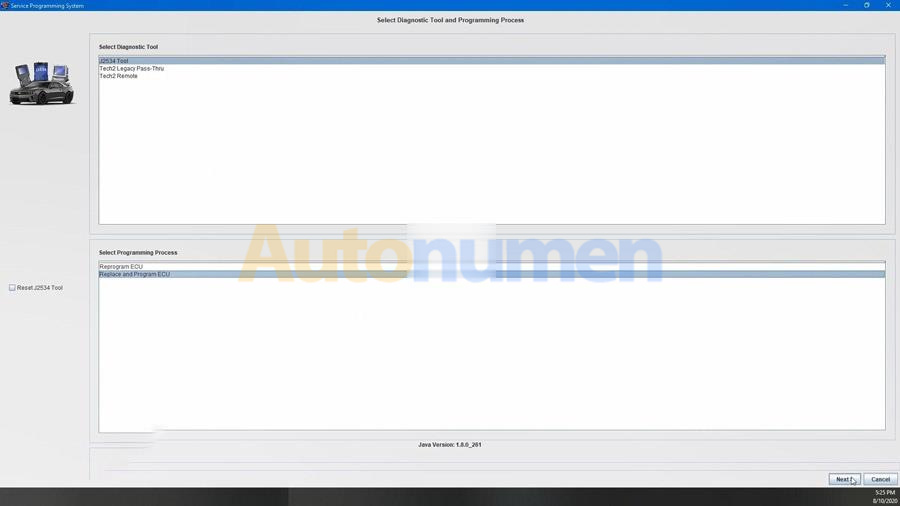
If we hit this button “SPS will pop up, let me drag it over so we can see it and here it is now whenever we select it we’re going to do a J2534 tool and we are “Replace and program ECU”, because we have an ECM that we don’t know that is necessary for this vehicle, I’m going to go ahead and plug it in now, and then we will hit “Next”,  should pop up 
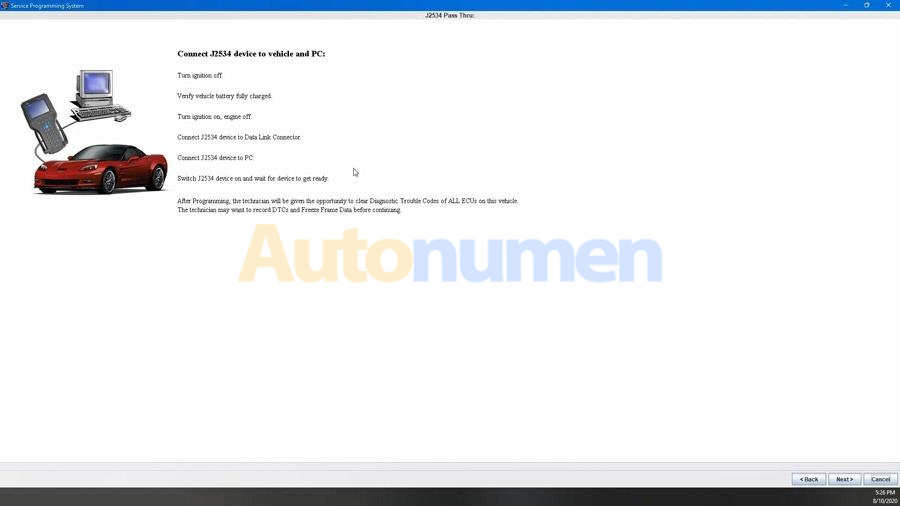
and it will say “OK” we need to connect it to the vehicle, let’s go ahead and we will turn it on, and hit next, so it did not ask us which device that we want to use I’m gonna go back and do “reset J2534 tool”, it should pop up and say hey what do you want to use because it should be asking us.
GM MDI2 Clone SPS Programming ECM (Update, Setup etc)-13 (2) GM MDI2 Clone SPS Programming ECM (Update, Setup etc)-14 (2)

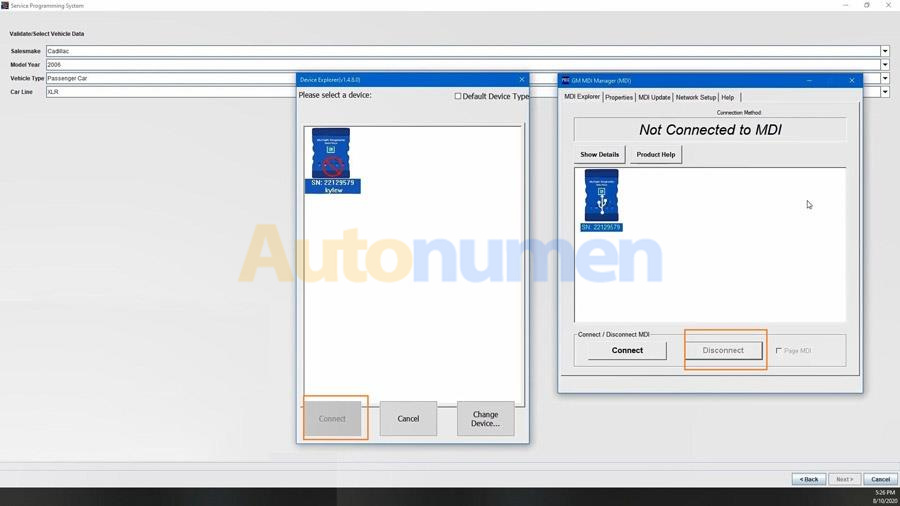
To choose a tool, we will try this anyway, but I have a sneaking suspicion, we may have to restart. Okay, here, it goes now, it finally popped up and saying hey which tool are you using and we’re using the MDI2 in this case, if you have the MDI1 you would choose it, we will hit “continue”.

GM MDI2 Clone SPS Programming ECM (Update, Setup etc)-15 (2) GM MDI2 Clone SPS Programming ECM (Update, Setup etc)-16 (2)

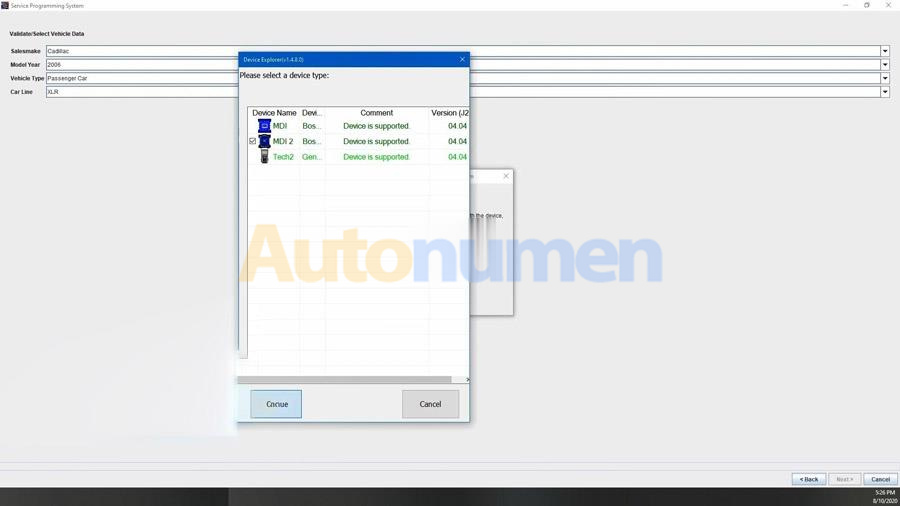
And then now it’s going to pop up a window and say hey choose one of these now I’ve got this device, it is not allowing me to connect. I’m going to disconnect in the background here to make sure that is not causing an issue.

And now we can connect here.

GM MDI2 Clone SPS Programming ECM (Update, Setup etc)-17 (2) GM MDI2 Clone SPS Programming ECM (Update, Setup etc)-18 (2)

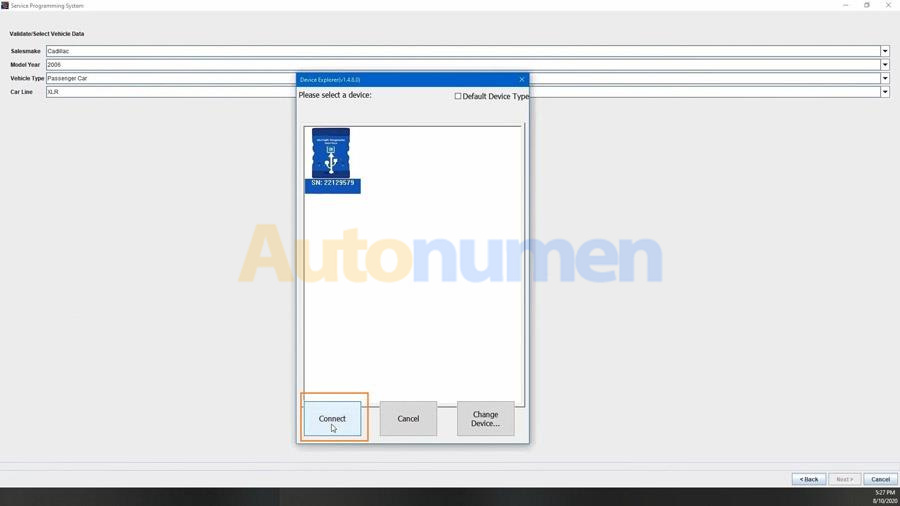
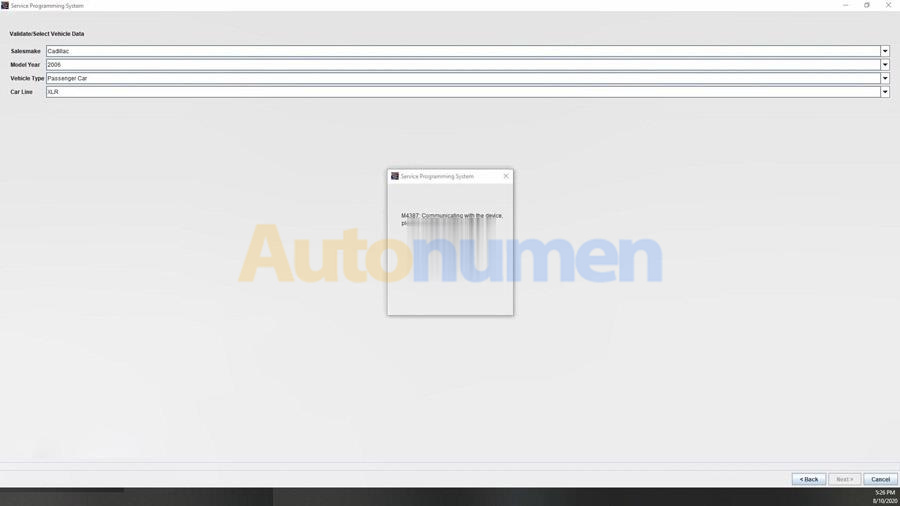
Okay, it is communicating with the device, I show on the device that helps the cars lit up the usb port is lit upon the MDI2 and it is connected to a E67 and there it grabbed our vin number that is currently on the E60, actually this is the one we’re programming, so we will collect next year and it’s going to give us. Okay so it says is not a sign.

so this is the VIN number that is currently on this, this is 549 VIN, this looks to be a Corvette ZR1.

GM MDI2 Clone SPS Programming ECM (Update, Setup etc)-19 (2)

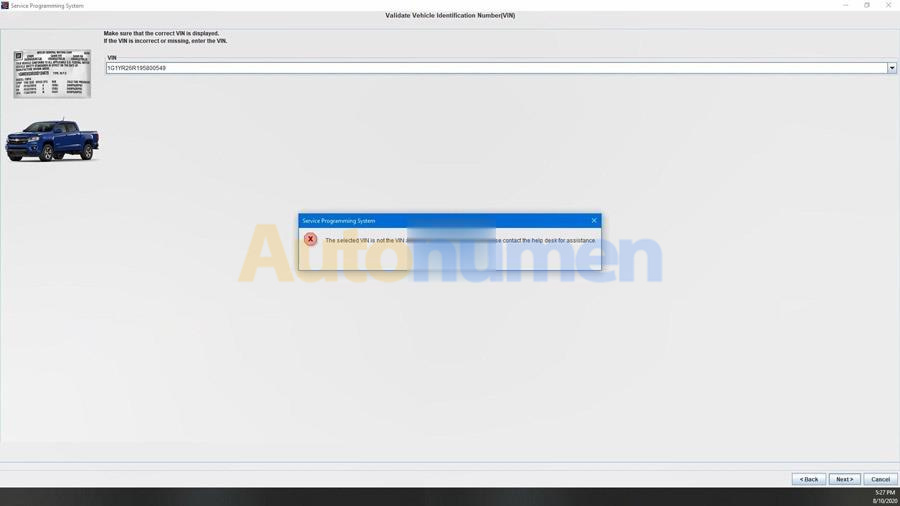
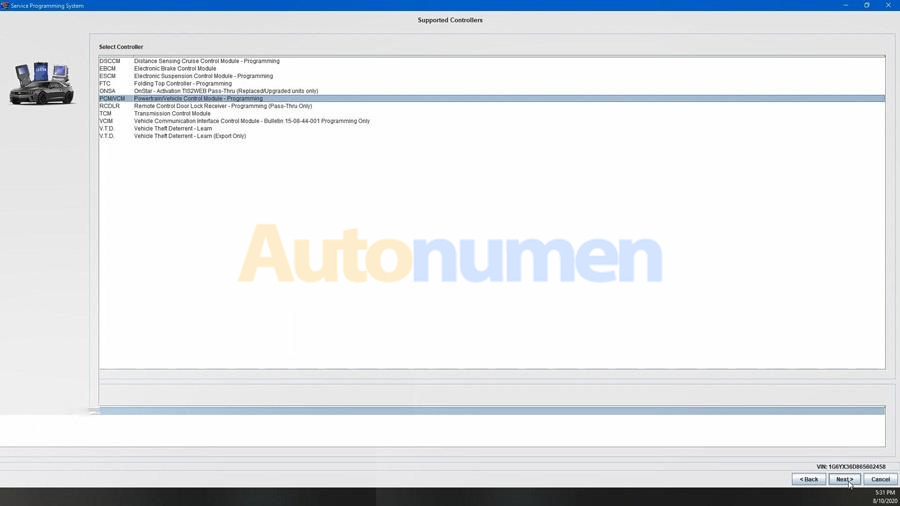
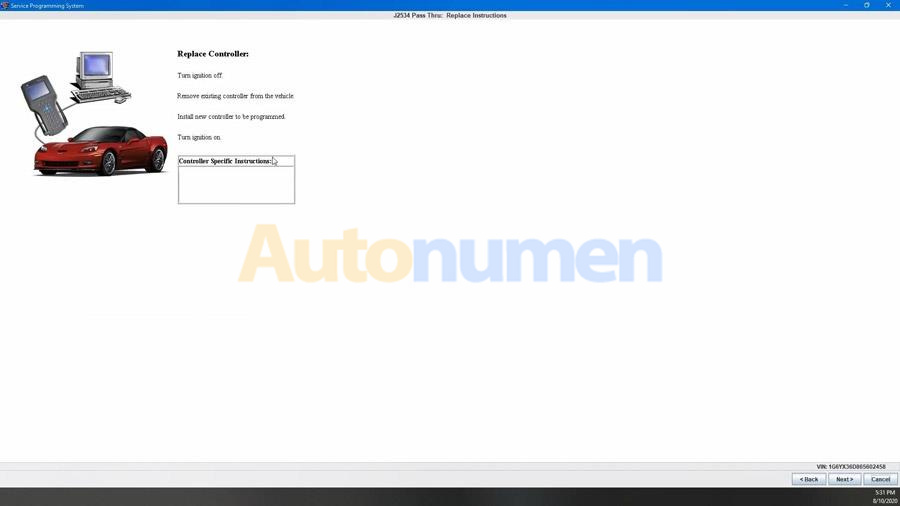
Okay we’re gonna go back, I’m gonna show you what we got put in here and this is the VIN of that is on the ECM. Right now that is for a Corvette, I’m going to paste in the vin number for Cadillac because we’re trying to put this programming and it’s going to take us over to our options here, so this is Powertrain vehicle control module we’re programming that we’re gonna go normal VCI, if you have a specific code from GM Tech line for options,  we normally don’t have options to get those code, so we’re just going to be normal and it’s going to tell us turn the ignition off, remove the existing controller from vehicle, we’ve pull it out and put the new one in, turn the ignition back on.

GM MDI2 Clone SPS Programming ECM (Update, Setup etc)-20 (2) GM MDI2 Clone SPS Programming ECM (Update, Setup etc)-21 (2)

And we’ll go ahead and hit next, it’s going to communicate with the CEM and its gonna write everything in.

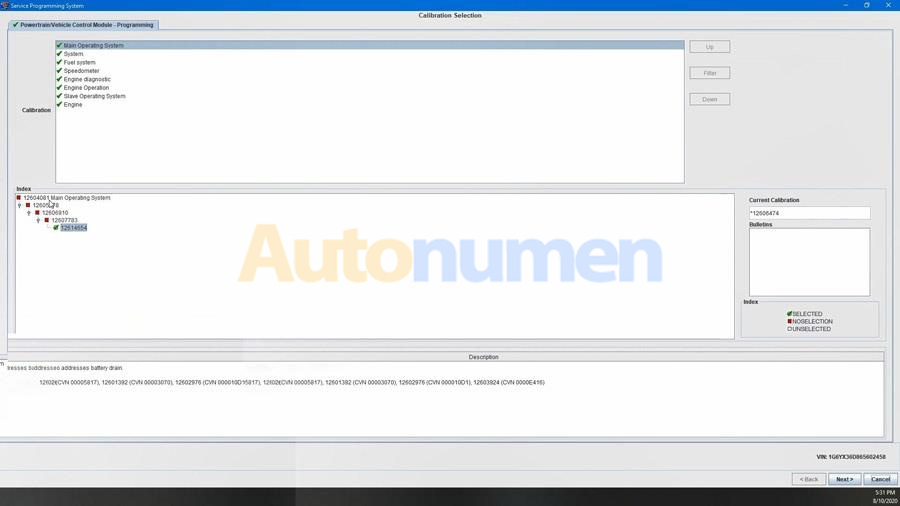
Okay, now showing us the different operating systems for the main operating system that were available, you can go down here, look at the history showing what all they’ve done, you know enhancements for these DTCs things like that we don’t care about any of that because we’re going to be installing the latest grades which is 12614654, we hit next.

GM MDI2 Clone SPS Programming ECM (Update, Setup etc)-22 (2)

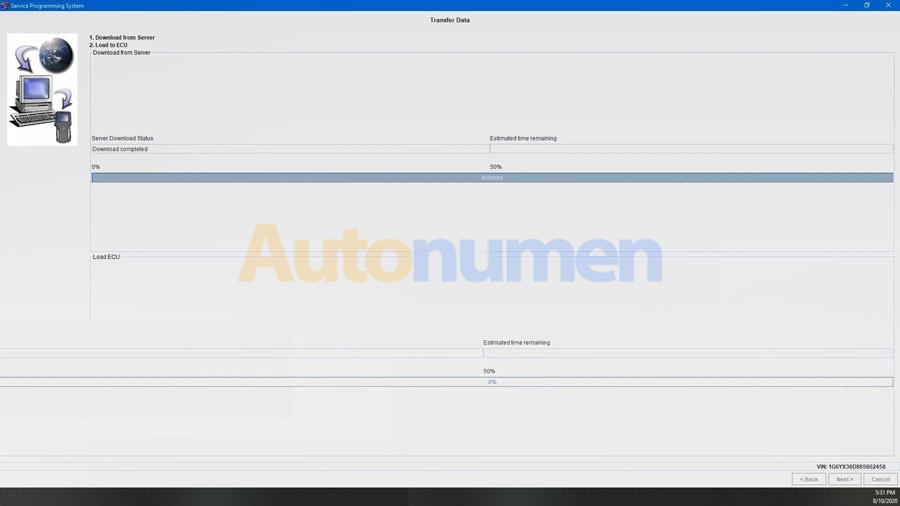
And then next and it’s going to download which is already done, and now it’s going to reprogram.

GM MDI2 Clone SPS Programming ECM (Update, Setup etc)-23 (2) GM MDI2 Clone SPS Programming ECM (Update, Setup etc)-24 (2)

okay we’ve got 3 minutes left before programming finish. I want to touch on a couple of tips that are gonna help you in the programming process:

1.Getting this thing set up as I said the big one;

2.Get the latest version of Java get that installed do that right away, they’ll help you out.

3.Then go out look for the Bosch MDI software whether or not you’re using the MDI 1 or MDI2, both of them are the same software platform.

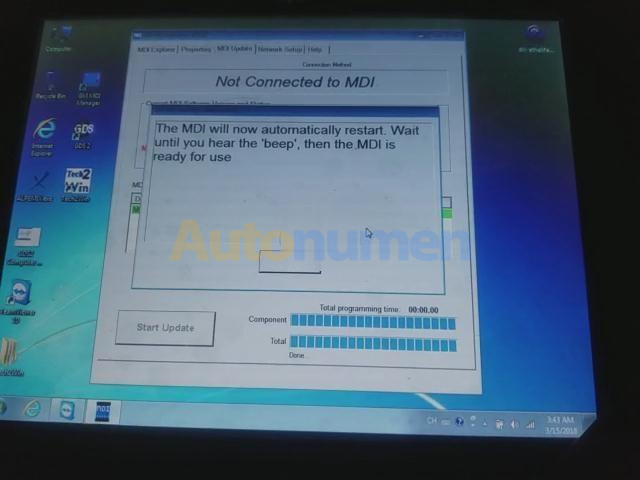
4.Now whenever you connect up to SPS the first time it will update your device to the latest version of the hardware, so just be prepared for that, and if it has issues connecting after doing updates like that reboot your computer I have to reboot maybe twice to get this thing to work.

5.The big one though, make sure whenever you launch your browser that you are right clicking and choosing run as administrator that will allow you to make sure that all of the software that is trying to load whenever you launch something like GDS2 or SPS gets properly loaded.

6.Without that J2534 Wrapper being loaded this thing just does not work, it will not find the device and as you saw whenever we went in there we actually had to disconnect from the GM MDI manager because it popped up a new window through SPS to connect to it, so if you’re going through and setting this thing up on your network, you don’t have to worry about this, once you get it set up you’re not going to be using the MDI Manager anymore, then whenever SPS is looking for the MDI, it’s gonna pop open that window and say hey which MDI or MDI2 are you trying to connect to.

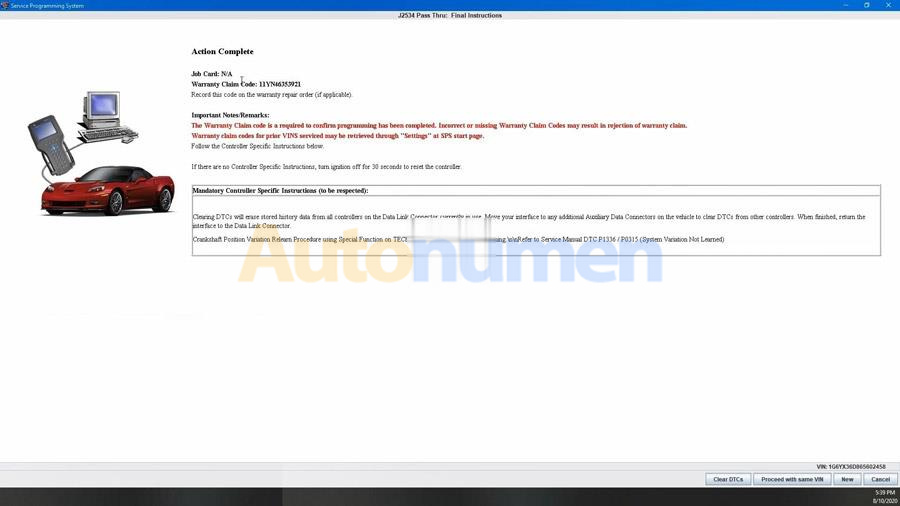
Ok, so we’re done and as you can see here there’s actually some cool stuff that pops up like the warranty claim code in case you’re replacing this for a warranty. Cool thing about that claim code will show up there are specific warranty updates that come out for special vehicles are certain vehicles I’ve gone through and done recalls on all my own vehicle through that and I have the warranty claim codes, you can call in and say hey, here’s a warranty claim code from this VIN I’ve already completed this, stop sending me those notifications, other than that he’s going to tell you to go ahead and turn off the ignition to reset the controller and then clear any DTCs and then other than that we are done, in fact we can turn this back on hit “Clear DTCs” button, it’s gonna clear DTCs, but we would get a ton more on this device are this ECM because it’s not plugged into anything except for our test setup here.

GM MDI2 Clone SPS Programming ECM (Update, Setup etc)-25 (2)

Okay, I’m pretty happy with GM MDI2 clone there was a couple of steps that I stumbled through on the initial set up, but once I got setup, everything went smooth as silk.

2021年11月25日星期四

How to Update GM MDI & MDI2 Firmware?


The reason why update GM MDI / MDI2 interface firmware is because it is compatible with the newest original GDS2 software, and only after doing firmware update can the newest v2020.12 Bosch software recognize it.

Here we go for GM MDI Manager update procedure.

Press and hold the power button on GM MDI 2/ MDI device, meanwhile plug the power adapter to the device, until the power indicators turn green, release the power button.

How to Update GM MDI & MDI2 Firmware-1 (2) How to Update GM MDI & MDI2 Firmware-2 (2) How to Update GM MDI & MDI2 Firmware-3 (2) How to Update GM MDI & MDI2 Firmware-4 (2)

Then use the USB cable to connect device with computer.

How to Update GM MDI & MDI2 Firmware-5 (2)

Install “GM MDI Manager 8.5.33.53 (the newest version)” and at the desktop open it.

How to Update GM MDI & MDI2 Firmware-6 (2)

Click on “MDI” icon and then “Recover”.

How to Update GM MDI & MDI2 Firmware-7 (2)

Read the guide “Do not unplug the MDI from the PC or remove power from the MDI during the update process.”.

How to Update GM MDI & MDI2 Firmware-8 (2)

Start… You can see the computer indicator will turn green, it means the MDI /MDI2 is communicating with the computer, and you will see the progress bar on the screen.

How to Update GM MDI & MDI2 Firmware-9 (2) How to Update GM MDI & MDI2 Firmware-10 (2)

Alright, the MDI will now automatically restart. Wait until you hear the “Beep”, then the MDI s ready for use.

How to Update GM MDI & MDI2 Firmware-11 (2)

GM MDI Manager update successfully, you can see all of the indicator will turn green one by one, and one you are ready to connect MDI / MDI2.

How to Update GM MDI & MDI2 Firmware-12 (2) How to Update GM MDI & MDI2 Firmware-13 (2)
Enjoy!

2021年11月15日星期一

How to Check 2012 Chevy Equinox by GM MDI2


My friend has a 2012 Chevy Equinox that uses newer GM network platform. No diagnostic coverage using a GM Tech2. The Equinox has been suffering some BCM problems lately with no way to plug in.. Only thing I could get was powertrain codes using a cheap scanner.

Anyway GM MDI 2 Used.  I got a good MDI clone from a trusted source Autonumen.com.  I have used this site since July 2009.
Bought a mdi2 wifi version with a hard drive. Came in today. It uses a laptop.
How to Check 2012 Chevy Equinox by GM MDI2-1

https://www.autonumen.com/goods-6947-GM-MDI-2-Diagnostic-Tool-Multiple-Diagnostic-Interface.html
How to Check 2012 Chevy Equinox by GM MDI2-2

works well, would recommend cloning HDD, as they seem to be easy to wipe it windows does a check disk.  The HDD has many different packages to install as needed. I have used on the Chevy, will try on a Buick next time I have one to work on.
This interface can do system diagnostics and ….added bonus….program replacement modules.

There is a MDI 1 version too.  I don’t mind if clone mdi 2 is same as mdi 1. I saw people using it without a problem.
Lenovo X220 Laptop is now setup with the GM MDI 2 manager software.  GDS2 identifies it as a MDI2.
So then wireless GM GDS2 diagnostics from home network (using ACDelco 3 day subscription) to laptop in garage…..then wireless from laptop to the MDI 2 in the car 30 feet away….it does work.
Lots of BCM codes. Equinox main problems were the wipers and washer would cycle on at key on…..4 way flashers were coming on 30 minutes after key off.  Both go thru the BCM.
Equinox is fixed with a new BCM. Ended up having local GM shop program the new BCM.
How to Check 2012 Chevy Equinox by GM MDI2-3 How to Check 2012 Chevy Equinox by GM MDI2-4 How to Check 2012 Chevy Equinox by GM MDI2-5
In case someone is interested, these are the PCBs of GM MDI2 .
How to Check 2012 Chevy Equinox by GM MDI2-6 How to Check 2012 Chevy Equinox by GM MDI2-7

2021年9月15日星期三

How should we do when GM Tech2 Cannot Detect CANDI Module

Problem:

I was concerned about buying from a company in another country. The shipment was delayed a few days due to the parcel service and caronavirus issues, but it is now on its way. Customer service was very good, they were very responsive via email, communication was great. I will certainly purchase from them again.
But, when I connect to obd2, it says “cannot detect CANDI module, please verify module is connected”. If it helps you, the green light on the candi module is flashing (not solid). I am not sure what to do. Can you help?


The solution From Autonumen.com technician :

I think I selected the wrong engine designation (there are 3) for my truck and the Tech 2 could not communicate

because it was looking for a controller that was not present (which presented the error message “no candi module”).

So, I think the tech 2 was OK.

It was my fault in my selections. I got it to work now!

Very appreciate the solution Chris provided! Hope it helps you all!

2021年8月9日星期一

1997 Chevrolet 3.1 Lumina loss of power solved with GM Tech2


Car model and year: 1997 Chevrolet 3.1 Lumina with 90K.

Issue:

A bit of a very slow coolant loss, and the pump was found leaking. Replacing that, about a month ago, it started having a loss of power between 20-40 mph. I took the car and found misfire codes on cylinders 2, 4, 5, and 6. I cleaned the MAS, replaced the spark plugs and wires, checked all the coil-packs with a spark tester (they checked out with strong spark), and checked the fuel pressure at the fuel tube that feeds the injectors.

With that done and the problem persisting (especially when the car warmed up to operating temp), I had Cottman transmission (very reputable guys at this local shop) and they checked it out and found the same engine codes, but stated the transmission was working fine.

What I did:

I took it for a test drive and here’s what she did:
1) Starting it, it had a slightly rough idle but moved easily at low speeds.
2) Upon pulling out of the neighborhood and onto a State road that headed uphill, I pressed the accelerator about 1/2 way as typical. Initially it accelerated as expected, but after about 30 yards it started to run at a lower speed and engine rev as if I reduced the pedal to about 1/4.
3) When the car reached the crest of the hill, even though I didn’t alter the pedal position, it began accelerating to a more expected 1/2 pedal acceleration.
4) The above was typical on all uphill slopes… oh, and when I got out with it running, I could smell un-burnt gas.

5) Noting the engine service light was on, I had the code pulled and received the following: PO301 “cylinder misfire detected – cylinder number 1”
6) I pulled the #1 wire (wires and plugs are new) and did a spark test, it was sparking strong and quickly at a separation of 36-38.

I’m going to pull the plug and check it for damage, but that is an extremely remote issue. I don’t even understand why 1 cylinder misfire would cause the acceleration issue that she has, it just doesn’t add up. Previously, before the heads were pulled, the misfire codes were intermittent misfire in cylinders 2, 4, 5, and 6.

When I last had the code pulled, it was PO300.

Chevrolet OBD2 code reader to use:

Foxwell NT301 code scanner

March 10th, 2020 update:

Here’s an example of one of the “printable” moments that the Foxwell recorded, there are well over 50 pages:
Calculated Load Value(%)14.9
Engine Coolant Temperature(øC)93
Short Term Fuel Trim -Bank 1(%)-6.3
Long Term Fuel Trim – Bank 1(%)-2.3
Intake Manifold Absolute Pressure(kPa)71.0
Engine RPM(rpm) 1893
Vehicle Speed Sensor(km/h)20
Ignition Timing Advanece for #1 Cylinder(ø)-1.5 Intake Air Temperature(øC)51
Air Flow Rate from Mass Air Flow Sensor(g/s)36.42 Absolute Throttle Position(%)43.9
Location of Oxygen SensorsB1S12–B2S—-
Oxygen Sensor Output Voltage Bank 1-Sensor 1(V)0.045 Short Term Fuel Trim Bank 1-Sensor 1(%)-3.9
Oxygen Sensor Output Voltage Bank 1-Sensor 2(V)0.105 Short Term Fuel Trim Bank 1-Sensor 2(%)N/A
OBD requirements to which vehicle is designedOBDII

March 11th, 2020 update:

Just test drove her again and got the error code:
PO102
Mass of Volume Air Flow A
Circuit Low

I replaced the MAF a few days ago. So I remeoved the new plastic one and replaced it with the original aluminum one (that’s clean as a whistle) and there was no change in the error code. Plus, I then tested it with my multi-meter, here are the results:
1) With the harness disconnected and the engine/ignition off:
All three wires (red, black and yellow) ohm-ed out as ground.
2) With the key in the ignition and it turned to run position without the engine on:
The power wire (red) had almost 13 volts, the ground (black) wire was grounded, and the signal wire had about 6 volts.
3) With the engine running and the harness attached:
I tested the Hertz with my GM Scanner TEST BENCH set to 20 Hertz and the signal wire (yellow) had a fairly consistent 2.14 hertz at idle (engine warm) and when the engine revved it smoothly went to just above 14 hertz and then evenly went back down to 2.14 when the idle was slowly released.

March 11th, 2020 update:

To add to my complex testing, I ran the car with my Foxwell attached and the Foxwell has a (g/s) reading for the MAF during the events in real time. It seems it was registering 4-5 during idle and was at the 40-50 range when it was bogging down, but when it cleared and accelerated as expected, it was well into the high 60s and into the 70s. Is this something that assists? Both the original GM MAF and the new replacement AC Delco MAF are performing the exact same way.

March 16th, 2020 update:

I found the yellow sensor wire that goes from the MAF sensor to the PCM wasn’t clean when I used my Ohm meter, it showed about 1.71. I ran a new wire along the same route and spliced it into the existing connectors. The new test drive was markedly better in acceleration and speed. However, after clearing the code, it still showed “”PO102, Mass of Volume Air Flow A, Circuit Low.”

I grabbed an older laptop in great condition with XP on it, so I could run the GM program to flash the PCM, I’m loading XP Professional on it with Service Pack 3 so it should run it properly, and I’ll “flash” the junkyard PCM first to my daughter’s VIN and see if that fixes the issue.

March 19th, 2020 update:

Finished (though I had to go to a shop with a GM Tech 2 and basically rent it with the mechanic).

Everything is factory spec, and it idles and revs without issue. No trouble codes. Everything is within spec. when we looked over all the info in his Tech 2 readings.

When driving (though markedly better and gets up to highway speed great), still it seems the engine, as it is accelerating: feels that it either adjusts the fuel/spark a bit, or the transmission shifts prematurely into a higher gear or something (that’s the only way I can describe it). It’s weird to feel the car do something without driver input. Whatever it is is keeps the car from continuing its acceleration for a few seconds. If I give it throttle during the event, it downshifts and accelerates great through the issue. If I don’t alter the accelerator, and keep it steady during the event, it waits a few seconds and then shifts to overdrive and feels normal.

Since I changed the fluid and filter when I first was alerted of the issue by my daughter during my maintenance work, and the old fluid was discolored (aged) and there was no metal dust or filings on the magnet, I’m wondering if I just need to allow her to drive it and change the fluid again in a few days and see if it flushes more of the old fluid that was trapped inside the torque converter?

March 27th, 2020 update:

PROBLEM SOLVED
So my friend has some awesome equipment to test Hz and other sensor feedback and we looked at the Knock Sensor and the O2 Sensors (much more sensitive than mine as well as had the exact ranges of signal that should be expected). The Knock Sensor and the O2 Sensors both looked slightly out of spec, enough to do a test drive with first the Knock Sensor disconnected and then a drive with both the Knock Sensor as well as the upstream O2 Sensor disconnected.

With the Knock Sensor disconnected the drag or delay in acceleration under load was gone, though it wasn’t completely smooth. With both disconnected, it drove really well and there was no drag or delay or alteration of power during driving. I replaced both the Knock Sensor as well as the upstream O2 Sensor and tested the car again. It drives as it should.

So, in the end, the car had these issues:
1) the #1 cylinder had a head gasket leak, fixed with head gaskets replaced
2) the MAF sensor was sending inaccurate info and had a damaged wire, replaced
3) the vacuum Transmission Modulator was broken, replaced
4) the upstream O2 Sensor was not within spec, replaced
5) the Knock Sensor was sending wildly inaccurate info, replaced

Interestingly, only item #2 above was determined by the PCM to be in error and would throw a Service Engine Soon light or throw a code, the PCM was silent on the other errors. I guess a ’97 GM PCM was not very sophisticated.

2021年8月8日星期日

What is Porsche PPN, Porsche PPN certificate, Importing PPN certificate


Porsche PPN is a Porsche dealer network, which can be used as a VPN for Porsche dealers
The Porsche PPN certificate is an authorization certificate for Porsche dealers

Porsche PT3G VCI,Porsche Piwis tester 3

Importing PPN certificate

The PPN certificate can be used to establish a connection between the PIWIS Tester and the PPN in the background when the PIWIS Tester is connected to the Internet. The relevant functions can then be used for:
•Sending VALs
•Online updates
•Updating date and time automatically
•Checking the Tester licence

The certificate can be requested and downloaded using the PPN access application.
1.Download the certificate following activation using Applications à PPN browser. To do this, switch to Porsche Partner Network Home.
After you have downloaded the certificate, the PIWIS Tester switches to the Certificate handling menu.

2.Enter the password and select Import certificate there.
The certificate is imported. You can now access the “Porsche Partner Network” page in the PPN browser. If the certificate was imported successfully, applications like the PIWIS information system, for example, are available following login.

Imprint and certificates

Menu path: System à Imprint and certificates

Note: You can display the current imprint and the certificates in the System à System status menu.

Note: Assign all users in the Porsche Centre to the PPN certificate.

The following tabs are available:
•Tester imprint: You can generate request keys, enter licence keys and display licence information here.
•Address: You can enter the dealer’s address here.
•Certificate handling: You can display the installed certificates, import certificates and delete certificates here.

Note: You will find information about the Tester imprint and Address tabs here.

Certificate handling

The Certificate handling function is used to install the PPN certificate that was downloaded from the PPN and delete existing PPN certificates.

The PPN certificate can be requested and downloaded using the PPN access application. The Certificate handling function starts automatically when you download the certificate. You will need the valid import password for this.

Note: Always select “Yes” in response to all messages during the import process.

2021年8月3日星期二

Possible to use GM Tech 2 clone for HUMMER?


This is about GM Tech 2 scan tool for Hummer troubleshooting and programming.

Can I have a cheap Tech 2 for Hummer?

Yep. Both the original and HQ clone can work for your car.

Where can I get a working clone at a good price?

https://www.autonumen.com/goods-1568-GM-Tech2-Scanner-for-GM-SAAB-OPEL-SUZUKI-ISUZU-Holden.html

Why my Hummer is not shown in the GM vehicle list?

That little short list is incorrect and only shows a few of the earlier than 2007 CAN bus vehicles.

Tech 2 clone for both troubleshooting and programming Hummer?

I’ve used my Tech2 on my 08 many times for troubleshooting not programming

But I think it should be able to program Hummer.

Anyone has good success of Hummer H3?

My H3 has had a CEL on – po452. I checked it with the tech 2. Well it pulls 3 codes, po455 (large evap leak), po442 (small evap leak), and po449 (vent solenoid control).

Tech 2 is possible to program for Hummer H2 above the year 2007… what to do in that case?

Actually it does the programming just fine on newer than 2007 GM vehicles BUT you must pay for an ACDelco TDS subscription for vehicles above 2007 and you would use the CANDI module that comes with many of the Tech2’s for working with CAN bus vehicles. You can subscribe for it.

This is ONLY needed if you want to program or update the software in a module. ALL of the build in diagnostics and testing for vehicles up to 2013 works without the subscription or the older TIS2000 software. You only need those for doing actual programming. The older TIS2000 software – that is what has the programming was discontinued in 2007. TIS2000 does have the actual programming for all vehicles up to 2007. After 2007 GM went to the TDS system.

You can also get a newer style MDI or MDI 2 for diagnostics and programming. The catch with those. They have NO screen or built in software and you must pay for a subscription from from ACDelco TDS to use an MDI.

Other brand units, a very select few can do actual programming and use the pass-through method. NONE have the diagnostics that the actual Tech2 scanner or MDI interface (with the subscription) will have. Check with Autel and see if they have the full diagnostics and re-calibration for the rear air suspension on a Hummer H2. Not going to happen, there is too little demand for them to hack and reverse engineer that particular bit of code in a Tech2 to figure out the diagnostics and then write programming for that for their tool.

Possible to use GM Tech 2 clone for HUMMER-1 (2) Possible to use GM Tech 2 clone for HUMMER-2 (2)

2021年8月2日星期一

How to Force Porsche PDK Transmission Update with VXDIAG Piwis


How to: Perform a Forced PDK Update via VXDIAG Multi diagnostic Porsche Piwis ii/Porsche Tester III.

Applicable Model/Year

2013-2016 Porsche 981 Cayman and Boxster (Base, S, GTS) w/ PDK Transmission
2012-2016 Porsche 911.1 NA Carrera (Base, S, GTS) w/ PDK Transmission
2014-2016 Porsche 911 Turbo and Turbo S w/ PDK Transmission

How To Enable

This function must be performed by a Porsche PIWIS II tool. It will be possible with a Porsche Tester III but the workflow process may vary.

When And Why to Update

A forced PDK update is required when a vehicle possesses the Q033 ROM and an open campaign update is not visible via the PIWIS tool. This procedure will update the PDK to a Q061 or newer ROM.
This update is required to run the latest PDK OTS maps with custom features such as faster shift speeds, sequential shifter stalk, dual paddle to neutral, no kickdown, and no creep. These features would otherwise not be possible running the Q033 ROM.

Things To Look Out For

The update process does take some time (30 to 45 minutes), so it is important to have a battery charger (10A to 12A recommended, or a charger with a “flash” setting will work) on the car’s battery during this process. It would also be a good idea to keep a charger on the PIWIS II computer as well.

If you have a PIWIS III tool, the workflow procedure may slightly differ.

Steps to Use

NOTE: BEFORE PROCEEDING, ACCESSPORT MUST BE UNINSTALLED FROM VEHICLE.

Connect a battery charger to the car’s battery, put the key in the “ON” position (engine off), and turn on the PIWIS2 tool. The PIWISII will need to be connected to the OBD II port at his point as well.
At the main menu on the PIWIS-II, select DIAGNOSTICS >> 911 >>> 991. Your selection may vary if you have a Boxster/Cayman.

How to Force Porsche PDK Transmission Update with VXDIAG Piwis-1 How to Force Porsche PDK Transmission Update with VXDIAG Piwis-2 How to Force Porsche PDK Transmission Update with VXDIAG Piwis-3

3. At this point, the PIWIS II will load up the software and prompt you to a new menu.

How to Force Porsche PDK Transmission Update with VXDIAG Piwis-4 How to Force Porsche PDK Transmission Update with VXDIAG Piwis-5

4. Select the “Transmission Control” unit control. After this is selected, scroll to the right on the top overview bar and select “Programming”.
You can now select “Automatic Programming” and hit the “Next” button on the bottom right of PIWIS II.

How to Force Porsche PDK Transmission Update with VXDIAG Piwis-6 How to Force Porsche PDK Transmission Update with VXDIAG Piwis-7 How to Force Porsche PDK Transmission Update with VXDIAG Piwis-8 How to Force Porsche PDK Transmission Update with VXDIAG Piwis-9
5. From here, Unit Documentation and the update will begin, several prompts regarding battery charger use and ignition on will appear. Continue to press the “Next” button on the bottom right to move forward with the process. You can keep an eye on the progress bar on the bottom and Steps listed at the top. Keep an eye on the VXDIAG Porsche Piwis for any ignition off sequences or need to press the “Next” button.

How to Force Porsche PDK Transmission Update with VXDIAG Piwis-10 How to Force Porsche PDK Transmission Update with VXDIAG Piwis-11 How to Force Porsche PDK Transmission Update with VXDIAG Piwis-12

How to Force Porsche PDK Transmission Update with VXDIAG Piwis-13 How to Force Porsche PDK Transmission Update with VXDIAG Piwis-14

6. When you finish the final step, step 12, an information prompt will appear. Hit “Next” to be shown success programming.

How to Force Porsche PDK Transmission Update with VXDIAG Piwis-15 How to Force Porsche PDK Transmission Update with VXDIAG Piwis-16

7.And that’s it, you’re done! This would be a good time to check for any transmission fault codes and clear them if they are present. You can confirm you are on the latest Q061 ROM by selecting the “Transmission Control” function on the main menu and selecting “Extended Identifications” on the top scroller bar.

How to Force Porsche PDK Transmission Update with VXDIAG Piwis-17

Done.